Halaman

    Social Items

Visit Namina Blog
Showing posts with label Android Tricks. Show all posts
Set up Parental Controls on Google Play Store | Viva Tricks

You can turn on parental controls to restrict the content someone can download or purchase from Google Play on your device.
Google Play Store to install all sorts of new applications and games on Android is a favorite pastime. Given the interest of the people are being made all sorts of applications. Some applications are highly unethical applications in the top list. All I want to do is to afford them and may take anywhere because of embarrassment. This is quite in time after Google Android and the latest version of the Google Play Store, while realizing that it has submitted redressal.

Note that this option is the latest version of Google Play Store and is available in 6.0. You have come to the Play Store installed which version of the Open Settings Play Store to find and click on the top line of the menu on the left.

Set up Parental Controls on Google Play Store | Viva Tricks


Here you see Build version. If you do not click Update, the update will be available to download up to be.
If you click on the Google Play store if the current version will have the same settings in Parental controls option.
You will see that parental controls are off. Turn it On while sliding.

Set up Parental Controls on Google Play Store | Viva Tricks


The next step will be to create a PIN. You can select a four digit PIN. It can not disable any of these controls is back in this case.

Set up Parental Controls on Google Play Store | Viva Tricks


You can see the next step that comes the option to control the apps and games. Here you can select age.
This option would certainly be extremely useful for all family members, including children and women.


Set up Parental Controls on Google Play Store


Most of the people that do not read WhatsApp messages immediately by sending a message read receipt immediately report it is found that their message has been read. Of course if you know it will be a blue double-check a message has been read and the message that it means.

When was the last time WhatsApp time and date can also see all your friends. Well, you can disable these options, go to Privacy Settings that should not be read receipt nor you them but see when the line so you do not have time to last game of nor will you be able to see to read your messages.

All messages will be read WhatsApp that you want, but you do not know that you have seen your WhatsApp. The Shh No Last Seen or Read application will be required. This android application is available free to consumers. Text search her name on Google Play Store and will soon be installed.

Download from Google Playstore

To take advantage of this application that are included in the free version too often that you have to tolerate advertising.

Whenever the mood rather than read WhatsApp messages WhatsApp open secret in this application. Keep in mind that you'll only see new incoming messages to WhatsApp. The messages can be read only can not be answered. To answer, you must use the WhatsApp. Then close the application WhatsApp normally use when you go back online mode.

Read WhatsApp messages secretly

How to Clear DNS Cache on Android

You must come across a case when the Web page you visit regularly, just fails to load the browser on your Android device, when it is loaded fine on your other devices. Well, this is a problem we all face and it arises due to corruption in the DNS cache. For people unaware, DNS Cache memory is a file that contains the host names and IP addresses of the sites to make sure that the next time you visit the site itself, it loads faster. However, problems arise when the IP address of the Web page changes by the device or browser updates the cache, resulting in Web pages do not load up.


So, if you have been experiencing this problem on the Android smartphone, here are ways to clear the cache DNS on Android:

Clear DNS Cache on Android through Browser


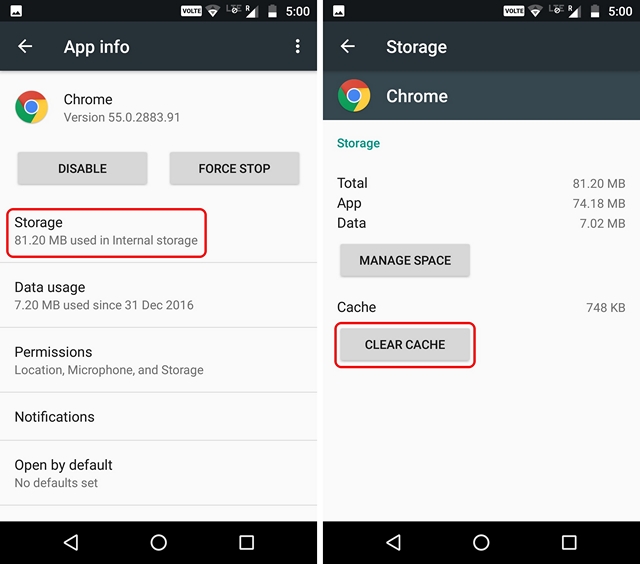
You can easily flush the DNS cache on your Android device through the browser you are using. You can just head to your browser’s settings and clear browsing data and cache and that should do the job. You can even do this by going to Settings Apps > Browser (the browser app you are using). Here, you can just go to "Storage" and tap on "Clear Cache".

How to Clear DNS Cache on Android | VivaTricks.blogspot.com

Clear DNS Cache in Chrome


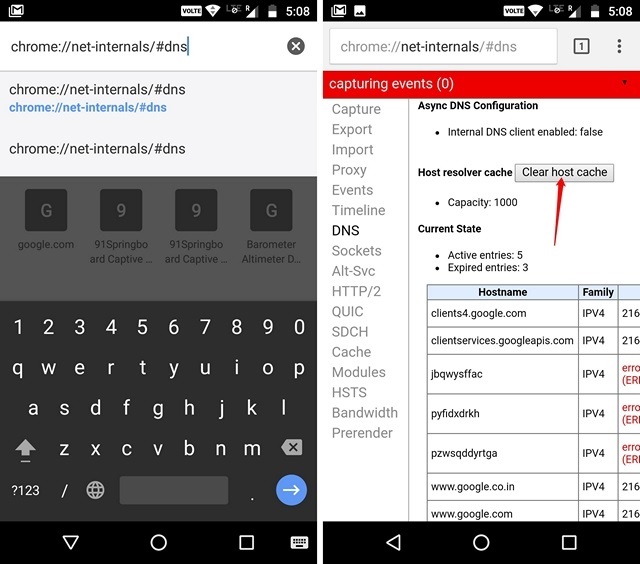
If you are using Chrome, you can clear DNS cache through a better way. You can just open Chrome and in the address bar, enter "chrome://net-internals/#DNS" (without the quotes, obviously). Here, you will find the various domain name caches. You can just tap on the "Clear host cache" option to flush DNS cache in Chrome.

How to Clear DNS Cache on Android | VivaTricks.blogspot.com

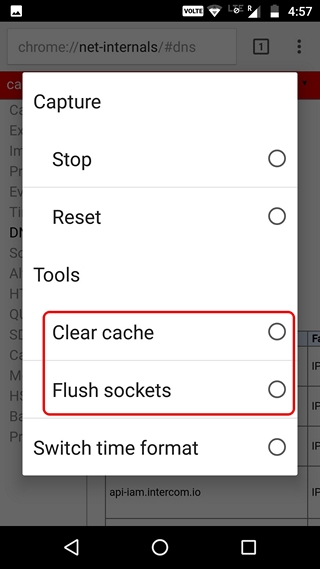
You can also make sure to "Flush sockets" along with "Clear cache" by tapping on the drop-down button at the end of the red bar. You can just select one of the options and hit the "Clear host cache" button again.

How to Clear DNS Cache on Android | VivaTricks.blogspot.com

Change DNS Settings on Android


If clearing DNS cache on Android does not resolve the problems, try changing the DNS settings on your Android device. There are two ways to change DNS settings on Android.

1. Change DNS Settings of WiFi network


If you are connected to a WiFi network, you can change the DNS setting for that particiular WiFi network. Here are the steps to do so:

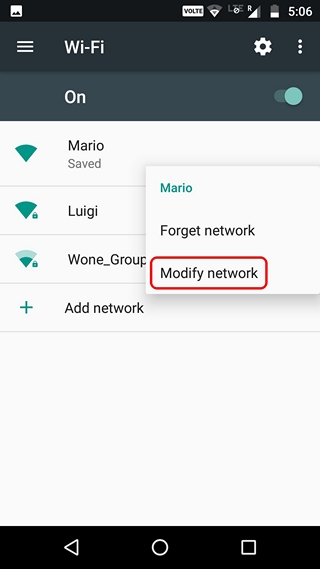
#1: First, head to Settings >WiFi. Here, long press on the network you want to modify DNS for.

How to Clear DNS Cache on Android | VivaTricks.blogspot.com

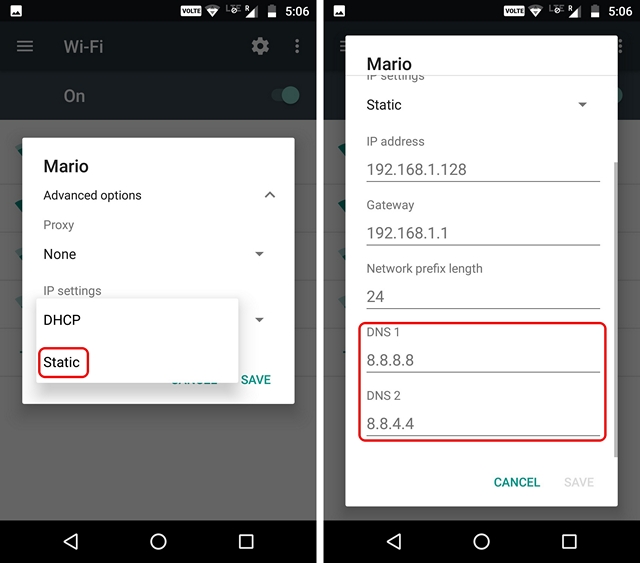
#2: In the pop-up that opens up, tap on the "Advanced options" button. Then, choose the "IP settings" to be "Static". Now, you can scroll down below, where you will find the option to enter a DNS address manually.

How to Clear DNS Cache on Android | VivaTricks.blogspot.com

2. Change DNS Settings via Third Party Application


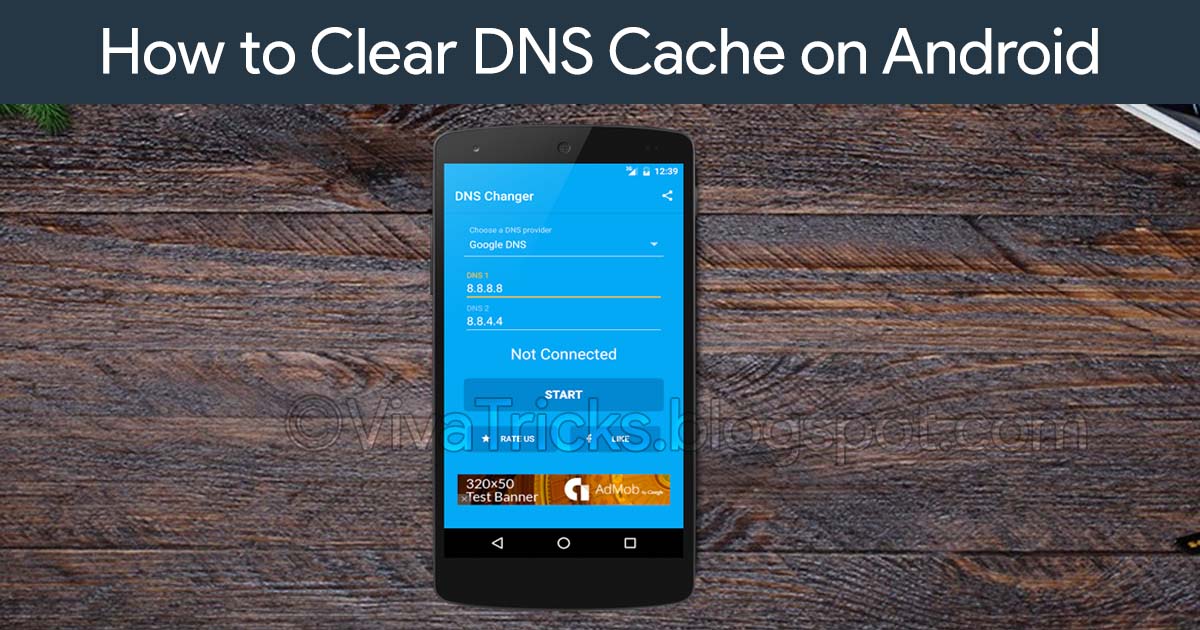
There are many third-party applications that allows you to change the DNS settings on Android. We use the DNS Changer (No Root 3G/WiFi) application, which as the name suggests allows you to change the DNS for each network. You can download the application from the Play Store. It's available for free, but includes ads.

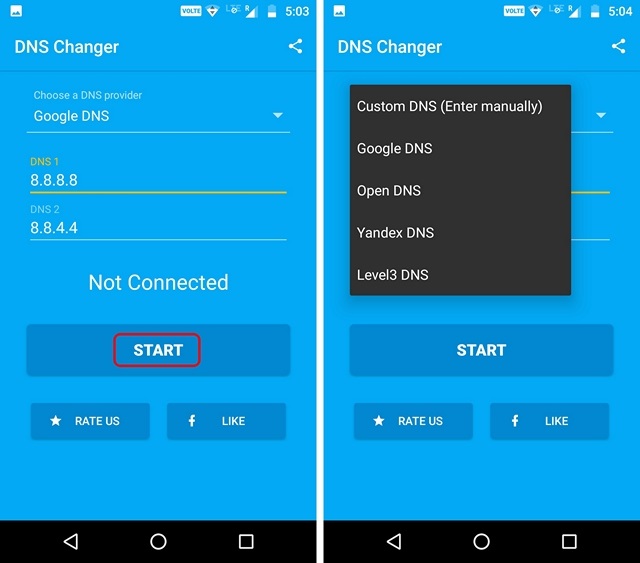
#1: After you installed the app, you can just launch it and you will see that the main page of the app features a "Start" button to change the DNS setting to your desired option. You can choose from Google DNS, Open DNS, Yandex DNS, Level3 DNS or set your own custom DNS address.

How to Clear DNS Cache on Android | VivaTricks.blogspot.com

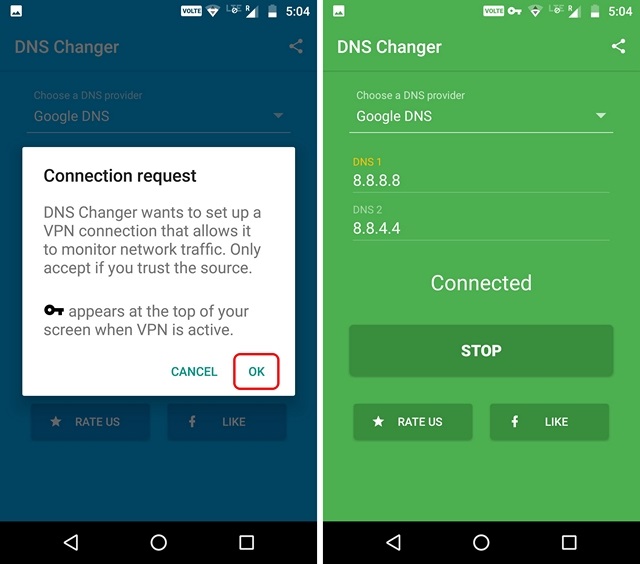
#2: Then, you can just hit the Start button and a connection request will pop up. Allow it and the new DNS setting will be enabled on your Android device.

How to Clear DNS Cache on Android | VivaTricks.blogspot.com

Clear DNS Cache on Android To Fix Problems with Webpages


Well, those were some easy steps to clear the cache DNS on the Android or to change the domain names on Android devices system settings. So, now you know what to do when a Web page does not load up. If you have any best practices, do let us know about it in the comments section below.

How to Clear DNS Cache on Android

How to Remotely Access Android From PC

TeamViewer software is a proprietary computer software for remote control, desktop sharing and online meetings package, web conferencing and file transfer between computers. Versions are available for Microsoft Windows, Mac OS X, Linux, iOS, Android, Windows RT, Windows Phone 8 and BlackBerry operating systems. It is also possible to access the device works TeamViewer software with a web browser. While the main focus of the application for remote control of computers, listed cooperation and provide features. TeamViewer software can be used without charge by non-commercial users, and Business, Premium and corporate versions are available. TeamViewer limited program was established in 2005 in Uhingen, Germany. Private equity firm based in the UK-based Permira got TeamViewer GmbH program more Durham, North Carolina-based developer GFI software programs in 2014. The company is also hosting a cloud called Airbackup online backup service.

How to Remotely Access Android From PC?


#1: Download and Install TeamViewer for Windows, Mac or Linux

#2: Install TeamViewer Quick Support App in your Android Phone.


#3: Install Quick Support Add-On  App depends on your Phone Company. It will also ask you automatically if you once open the Quick Support App.

How to Remotely Access Android From PC?

#4: Now Open the TeamViewer in PC and Phone.

#5: Copy ID from Phone.

How to Remotely Access Android From PC?

#6: Type in PC as Partner ID then Click on Connect to Partner Button.

How to Remotely Access Android From PC?

#9: Again Allow it from your Phone.

How to Remotely Access Android From PC?

#10: Phone Screen will be Appear on PC Screen. Use Phone Directly from PC

How to Remotely Access Android From PC?

#11: Done.

How to Remotely Access Android From PC?

Transfer Files between Phone and PC via WiFi

The future is wireless, and is now being implemented this trend headed by Android phones as well. These days a very small number of people actually prefer to use a USB cable to transfer files between their computers and their phones / tablets. The reason is very convenient transfer of files wirelessly transfer files through a USB cable, and add to the benefits, you do not have to wait next to your computer until a full transfer. When files are transferred to your phone you can keep your business in the other.

There are many applications on the Android store, which can help you transfer files wirelessly between your computer and Android phones. Among these applications, some come with bare and basic just like transfer files via Wi-Fi and some add many features more exciting features apart from the basic file transfer feature. For me, when it comes to features, I think the more the merrier. Even in this guide will benefit from the application packed to transfer files between your computer and Android phone feature.

Xender is a file transfer and file sharing on mobile devices tool. It allows you to transfer files of various types and sizes of equipment in your surroundings. They have Android version and iOS version of Xender, for Android and iOS, respectively. Xender can be moved between Android devices, among iOS devices, as well as between Android devices and iOS. Xender is a freeware application so no need to pay any form. You can download it for free from any Google Play Store or Apple App Store. You can transfer almost every file type on your phone with Xender. Photos, music, documents and videos, and you can even transfer applications and games that are installed on your devices. With iOS devices, files can be transferred include contacts, photos, videos types, due to the limitations of the iOS operating system. Xender require any internet connection to function. It makes use of hot your phone Wi-Fi feature, and this is independent of any contact with the outside Internet. Xender makes use of hot your phone Wi-Fi feature to transfer files and certainly your mobile data will not be used. By default, you will Xender temporarily disable mobile communication to the Internet through file transfer session will be restored when the pieces of the collection. In previous versions of Xender, they have this function. However, it has decided to raise the level of this feature in a separate application called Xender computer (WeLine). This new application will make the process much easier for you, and also provides a lot of new and awesome features as well. Xender computer (WeLine) is also available in the Google Play Store and the Apple Store.

Features:


  • Faster than Bluetooth (up to 50 times faster than Bluetooth)
  • Easier than AirDrop
  • No need for NFC
  • Transfer of files between iOS and Android devices
  • Transfer of files between Phone and Computer
  • Sharing files of multiple types without any data usage
  • Group sharing is supported for up to 5 devices at a time


Download and Install app:

Transfer Files between Phone and PC via WiFi

How to Receive Android Notifications on PC/Mac?

You missed a lot of notification because you have been working on the computer and that the phone was on charge or away from you? We all face this problem. We can not always put our phone in our pockets while in the house. Sometimes, we missed the notice is very important as we need to respond immediately, but we can not respond just because we did not know anything about it.

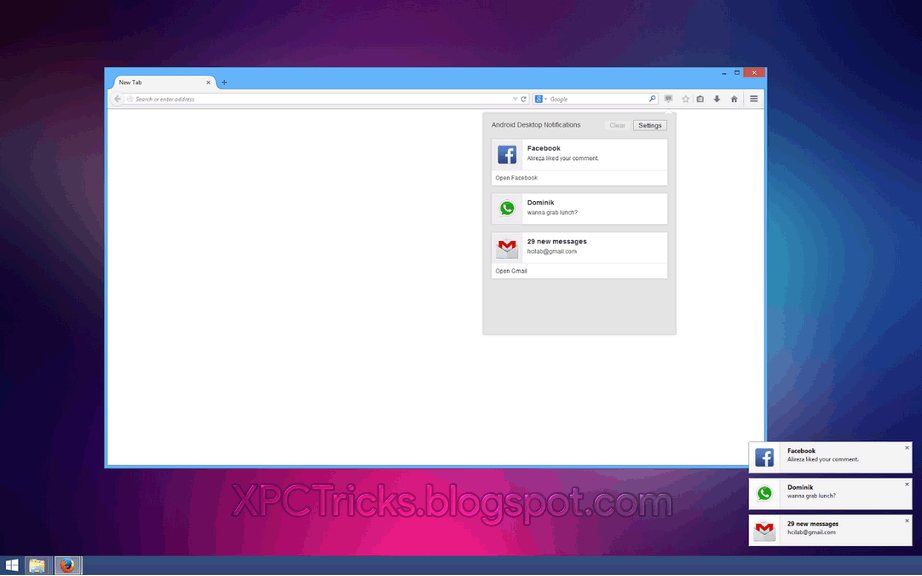
But there is no worry about this problem because we have a solution for that. Ie, we do not need to download any software on our computer. All we need to do is install the extension in our browser. This application gets all your Android notifications right on your computer screen immediately so as not to miss any of them. This application with each application runs Android also support sucker. If Let's start:

Step 1: Setting up Extension


#1: Install an Extension in your Browser [Google Chrome | Mozilla Firefox]

#2: After Installing, Click on Icon (with Address bar).

#3: Sign in with your Google Account.

How to Receive Android Notifications on PC/Mac?

#4: Click Allow to access your account.

How to Receive Android Notifications on PC/Mac?

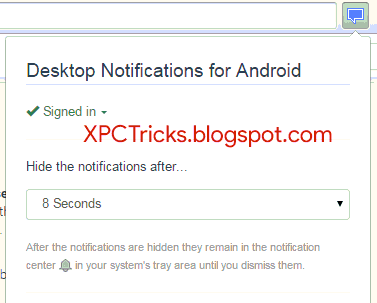
#5: Setting it up according to you.

How to Receive Android Notifications on PC/Mac?

#6: Done

Step 2: Setting up Phone App.


#1: Install this App in your Android Phone.

How to Receive Android Notifications on PC/Mac?

#2: Open the App.

#3: Click on Open Settings Button.

How to Receive Android Notifications on PC/Mac?

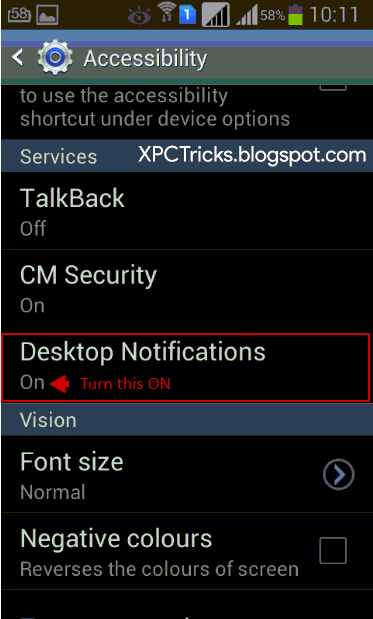
#4: Turn On Desktop Notification Service

How to Receive Android Notifications on PC/Mac?

#5: Open app again and scroll down.

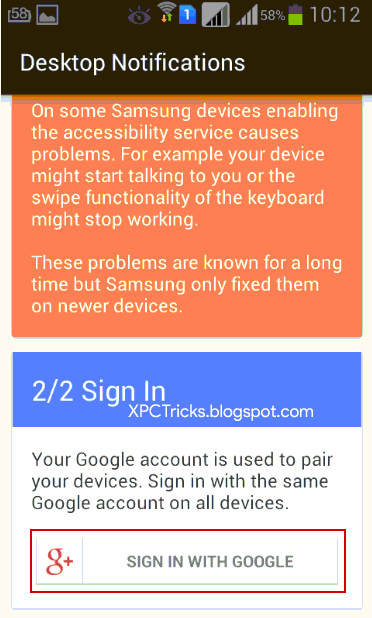
#6: Sign in with Google with same account your sign in your PC.

How to Receive Android Notifications on PC/Mac?

#7: For Google Chrome Users, its Done but Firefox users copy code.

How to Receive Android Notifications on PC/Mac?

#8: Fill this code in your Firefox addon.

#9: Done.

How to Receive Android Notifications on PC/Mac?

How to Receive Android Notifications on PC/Mac?

How To Root Android Device without PC in One Minute?

Rooting is a process of allowing users of smart phones, tablets, and other devices that operate on the Android mobile operating system to achieve a distinctive control (known as root access) on the various subsystems robot. Android also uses the Linux kernel, rooting Android device that allows similar access to administrative permissions as on other Linux or Unix-like operating system such as FreeBSD or OS X.

All too often rooting in order to overcome the limitations that carriers and device manufacturers to put on some devices. Thus, rooting gives the ability (or permission) to change or replace the applications and system settings, run specialized applications that require administrator-level permissions, or perform other operations that can not be accessed unless the user to normal robot. On Android, rooting can also facilitate the complete removal and replacement of the operating system of the device, usually with the launch of a newer version of the current operating system.

Sometimes it is compared root access to the tricks devices that run on Apple's operating system iOS. However, these are different concepts. Bypass describes the tricks of the several types of ban Apple's end user: Amendment of the operating system (forced by the "locked bearing"), and the installation of approved applications is officially over sideloading, and the granting of privileges on the high level of user management. Only a minority of Android devices lock the bootloaders and many vendors such as HTC, Sony, Asus and Google expressly provides the ability to open devices, and even replace the operating system altogether. Similarly, the possibility of transferring applications are usually allowed on Android devices without root permissions. Thus, it is primarily on the third side of the IOS and tricks relating to give users administrative privileges Ripper, which is linked directly to Android rooting.

Caution
Rooting an Android device may Void your device warranty or if rooting process is not done properly, your device may also get bricked. We are not at all responsible any damages caused to your device while rooting.

How to Root Android Device without PC in a Minute?


#1: Go to your Phone Settings.

#2: Scroll down and click on Security


#3: Then Scroll down and Tick for unknown sources option.


#4: Maybe warning popup will be appear. Ignore it and Click Ok.


#5: First check supported devices for using this app

#6: If your Device supportable then download and Install the Framaroot App. [Direct Link v19.3]

#7: After installing, open the app.

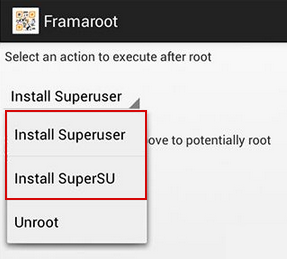
#8: Now select what you want to install, Superuser or SuperSU.


#9: After selecting, click on Gandalf. If app crashed by clicking on Gandalf then don't worry. Relaunch the app and it will not crash second time.


#10: After sometimes, it will show you a message about success.


#11: Reboot your device.

#12: Done. Your device in rooted now.

How To Root Android Device without PC in One Minute?

Turn Android Phone to Complete iPhone Look

IPhone, iPod Touch and iPad operating system known as iOS (iPhone OS earlier). This is a variant of the same Darwin operating system core that is found in the operating system Mac OS X. Also included is the "Core Animation" software component of the operating system Mac OS X v10.5 Leopard. Along with the PowerVR hardware (and on the iPhone 3GS, OpenGL ES 2.0), which is responsible for the animation and interface for. The operating system takes up less than half a gigabyte. It is capable of supporting bundled and future applications from Apple, as well as from third-party developers. You can not copy software applications directly from the operating system Mac OS X but must be written and compiled specifically for iOS. Such as iPod, iPhone and runs from a computer using iTunes. The earliest versions of the required operating system version 7.3 or later, which is compatible with the operating system Mac OS X version 10.3.9 Tiger or later, and 32-bit Windows XP or Vista. The release of iTunes 7.6 extend this support to include 64-bit versions of XP and Vista, and has been the discovery of the solution from the previous systems and Windows 64-bit operating.

Downloads

Note
I personally test this trick on my Samsung Galaxy S4 and all given features worked properly in my Phone; but, if in your case, any damage happened to your device then i will not responsible at all. Do this at  your own risk.

How to Turn Android Phone to Complete iPhone Look?

#1: Install and Open the iNoty in your Android Phone.

#2: Make it Enable by Turning on Accessibility and Notification Services.


#3: iNoty Enabled successfully. You can look your Notification bar. Its changed to iPhone's look.


#4: Install and Open iControl.

#5: Application once opened, it will enabled itself.


#6: You can Change Settings for iControl according to yourself (Optional).

#7: Now, Install and Open iDialer and iContact


#8: Done.

#9: Then Install iSettings and iCloud too.

#10: Set any iPhone Wallpaper for better look (i.e. this one)

#11: Now Install iLocker and activate it by making it default.


#12: Then Install and Open iLauncher.

#13: After Installing Press Center Home Button. (Maybe once or double tap)

#14: A message will appeared to select activity. Select iLauncher.


#15: Done.

Turn Android Phone to Complete iPhone Look