Halaman

    Social Items

Visit Namina Blog
Showing posts with label PC Tricks. Show all posts
How to Create Wifi Hotspot Connections on Windows 7 and XP | Viva Tricks

Here is a tutorial How to create Wi-Fi Hotspot Connection on Windows XP, 7, 8, 8.1 and 10.

There are a number of Wi-Fi devices in every home, such as laptops, tablet computers and mobile phones etc. Especially WiFi availability of mobile phones has general knowledge of the technology. To share its Internet connection with your different devices has also become our need. Obviously we can not live separately for each device. Common hardware router is needed for this work. Whose value may range from one thousand to ten thousand rupees. But in this article we will tell you that there is wi-fi which is a common computer, proceed to change the Wi-Fi router or hardware. "Connectrify" software lets you easily can share the Internet on your computer to run a Wi-Fi devices or computer. I have an Internet connection can be shared with all of the devices, including mobile phones at home or in the office with WIFI facility.

Some of the main features of this software


  • Connectify main goal is to make it available to computers in the Wi-Fi hotspot change of moving from other Wi-Fi devices.
  • If the Internet is already running another Wi-Fi network can share it.
  • Connectify hot spot can be seen from the attached list of all devices or computers.
  • The password can be set up to restrict the use of the Hotspot.
  • Made by Connectify network can be used like an ordinary LAN.

Making this software from the network, you can use it like a normal network and you do not even need a Hardware Router for it. For instance, you can take the help of Wi-Fi networks can transfer the file to another computer via a computer or a remote desktop session to the computer.
"Connectify" is very easy to use software. This free version can connect to ten different computers, mobile phones or tablets, etc. hotspot at a time and has a capacity of ten connections. If you like to use on the network then you will have to buy the software. This free version is enough.
This software has only two terms of software use. The first condition is that the hot spot to the computer, there is wi-fi. Usually you do not have Wi-Fi network device in desktop computers. For this you can easily buy the Wireless LAN Card market which can cost from five hundred to one thousand rupees quality. Wireless LAN is usually found in laptops.

How to Create Wifi Hotspot Connections on Windows 7 and XP | Viva Tricks
Wireless LAN USB

How to Create Wifi Hotspot Connections on Windows 7 and XP | Viva TricksThe second condition is that it can be installed only on Windows 7 or Windows 8 and 10. In fact, Windows 7 and uses the "Virtual Router" to facilitate Windows 8 that was not possible in earlier versions of Windows. It is necessary that the computer will make the hotspot, at least install Windows 7 on it. However, no such condition to connect the devices to the hotspot. Any operating system on them, Connectify is not concerned with this. With Connectify Cabel Internet, DSL, 3G or 4G modem but can also be shared to let the Internet via Wi-Fi. The installation and configuration is also very simple and easy. The connectify website you can download the latest version:
www.connectify.me
Downloading after they install it. The first run will be named to his new network. This software must be using free network name begins with "Connectify". The Connectify-com etc. If you use the Professional version can be selected custom name. Also choose your Internet connection here that if you want to share and start the Wi-Fi hotspot After choosing your system. Take your computer or laptop has now become a "Hotspot". Laptop or any other mobile wireless connections If you find that your hotspot will also be appearing there. After connecting it to your chosen password, you will see that the Internet has begun to walk on the device. In this work, which is installed on the PC you are currently on the connectify Which PC network can see it. Also here, as you can see various Action if you do not want to live or want to know the IP of a PC is also possible.

Internet Sharing on Windows XP


Suppose you have an internet running on Windows XP, but you want to share it. An easy way is that you install CC Proxy software called Windows XP. This software can be downloaded from the following link contests.

http://www.youngzsoft.net/ccproxy

How to Create Wifi Hotspot Connections on Windows 7 and XP | Viva Tricks


This software turns your computer into an Internet proxy. You can use the Internet now use the network computer or other Wi-Fi devices on the network proxy. Wi-Fi network, you can simply connect to a Windows XP computer, including all connectify to install on any Windows 7 computer devices. I have been going through a proxy on the PC Windows 7 will act as a hotspot but the Internet Windows XP. Remember that you will have to get a proxy browser for every computer and device.

Addition Method:


Running the Internet on your computer, you can use it with other devices on the network to change the Wi-Fi hotspot Wi-Fi. Wi-Fi hotspot comes in mind first connectify software name to the spot, but this software is capable of working with Windows Seven. If you were looking for a software for Windows XP or vista try "WiFi HotSpot Creator". This software can be used on Windows Seven. Specifically, it has to be absolutely free of cost. The dots are not getting the free version of the Connecticut-Fi. Spot hot as you can make it through whether users can connect to it.

How to Create Wifi Hotspot Connections on Windows 7 and XP | Viva Tricks


http://www.wifihotspotcreator.com/download.html

How to Create Wifi Hotspot Connections on Windows 7 and XP


There are some important files or document that you want to hide from the others on your computer. To do so might be creating a folder within a folder to hide these files but in today's tutorial will change this by teaching you exciting ploy interesting to hide files behind images.To hide file behind the image means that if any one opens that image was'll see the picture, but to see the hidden file We need to open that picture in a certain way. If let us begin.
How To Hide File Behind Image ?


#1: Select an image to be used for hiding file behind the image.

#2: Now select a file to hide behind the image and make it in .RAR format. With the help of the WinRAR.

#3: And most important is that paste both the files on desktop. You may do this anywhere instead of desktop if you have some basic understanding of command line.

#4: Now open Commnad Promt by typing CMD in windows search. Or Press Win + R from keyboard and type here also CMD and press OK.

#5: Type the following commands in it.
cd desktop


#6: CD stands for change directory by typing above command you change your directory to desktop. After that type command given below.

Copy /b imagename.jpg + filename.rar finalimage.jpg

  • Replace imagename.jpg with the name of image you want your file to be hidden behind. Don't forget to add image format (Eg: .jpg,.png,.gif)
  • Replace filename with name of your file you want to hide. It must be in .rar format.
  • Finally Replace finalimage.jpg with whatever name you want your final image with hidden files should be. This is the image where your file will be hidden.
Now when will attempt to open this newly created image it will open as a normal picture, but to open your hidden file, you need to follow the steps below.

How To Access Hidden File ?


To gain access to hidden files that has been newly created you need to open the image in WinRAR; Just follow the simple steps below to do so.

#1: Open Winrar.

#2: Now locate your image and open it or simply drag your image in winrar.

#3: Extract the file and done.

Hide your Data Behind Images

How to Lock/Unlock Mac or PC with USB | Viva Tricks

Every spy movie ever, has a computer that can be accessed only by connecting the particular flash drive, or something like that. Not only does it look cool, high-tech (in the way), it's also practical, instead you have to open USB flash or Mac or PC drive. There are a number of reasons for this - you do not need to type a password all the time. You can assign a password to a really strong password, and then do not need to remember it really, because you can simply open your PC or Mac with a USB drive and others, as well as a very strong layer of security on your system. So, if you're wondering how to do the same on your home PC, and here how to set up USB Lock on PC or Mac:

Set Up USB Lock on PC or Mac


Rohos Key Logon the most important is a software that can be programmed USB flash drive, mobile phone, or even a Bluetooth device to act as a key to unlock your system. The best part about this application is that it is available for both Windows and Mac computers. While it is a paid app, you can get a test version to check it out, before having to actually recording program for continued use.

So, with that out of our way, let's jump right to the steps that will have to take in order to create a USB flash drive that will allow us access to our system.

Note
I'm running Rohos program log on to the MacBook Air switch, Mac Sierra 10.12.4 developer beta, and although the steps that will follow here apply to the Mac, there must be only very minor differences when using the software on Windows.

#1: First, download the free Rohos Keu Logon the most experimental, and install it on your Mac. You'll have to restart your Mac after the installation is complete.

How to Lock/Unlock Mac or PC with USB | Viva Tricks

#2: Next, from the menu bar of your Mac, click on the Rohos Key Logon icon, and go to "Open Rohos Logon". This will open up the main Rohos Key Logon window.

How to Lock/Unlock Mac or PC with USB | Viva Tricks

#3: Here, simply click on the option that says "USB drive". Make sure that the USB flash drive you want to use for logging in, is connected to your Mac.

How to Lock/Unlock Mac or PC with USB | Viva Tricks

#4: In the next window, enter your system login password, and select the USB flash drive you want to use as a key, and click on "OK".

How to Lock/Unlock Mac or PC with USB | Viva Tricks

#5: On the next screen, you can select the action you want your computer to pick up if the pull out USB flash drive from the system. If you do not want to keep it plugged in, simply select "Nothing" in this screen.

How to Lock/Unlock Mac or PC with USB | Viva Tricks

However, in order to improve the security situation, I suggest that you keep the "desktop lock," when plugged out. This will make it easier for you to lock your PC or Mac when you leave them unattended.

That's basically all you have to do. Now you can easily open your PC or Mac, by connecting the correct USB flash drive. However, as of now, if people knew what your password, they still want to be able to log on to your system. If you want to eliminate the chances of that happening, simply follow these steps:

#1: From the Rohos Key Logon icon in the menu bar, click on "Preferences".

How to Lock/Unlock Mac or PC with USB | Viva Tricks

#2: Here, check the checkbox next to "Allow login only by USB key".

How to Lock/Unlock Mac or PC with USB | Viva Tricks

This will be you can register only in the event of a USB flash drive is present in the system ensures. This is a highly secure, but is also a bit risky. You could lose your flash drive, it can be broken, or it can get damaged. That is why, I suggest that you either do not disable log on with a password, otherwise, we have at least two USB keys, which can be called your system ... just in case.

Deleting the USB Key


If you do not want to use a USB flash drive as a key for your system anymore, you can easily remove the USB flash drive from Rohos, as well. Process to do this is simple:

#1: From the Rohos Key Logon menu bar icon, click on "Open Rohos Logon".

How to Lock/Unlock Mac or PC with USB | Viva Tricks

#2: Here, click on "Delete Key".

How to Lock/Unlock Mac or PC with USB | Viva Tricks

#3: Select the USB flash drive you want to remove, and click on "Delete".

How to Lock/Unlock Mac or PC with USB | Viva Tricks

This will remove the USB flash drive as a key for your system, and you can return to use the password to log in to your system.

Rohos recording the most important trial comes with 15 days, and after that, you will have to pay $ 25 to register for continued use. If you're looking for free alternatives to Windows, and there are quite a number of programs that you can try. However, with the exception of raptor USB , none of the others worked properly for me. USB Raptor works quite well, and can be used to lock / unlock Windows computer with your USB flash drive.

Secure Your System with Physical Access Keys


Physical access keys is one of the most powerful ways you can use to secure your system from unauthorized access. Even if the potential thief gets hold of your password, they still would not be able to log on to your system, unless you have access to a USB key that you created. However, the loss of the only USB for your system can be disastrous key, so you should always be a backup switch, somewhere, just in case.

So, do you want than ever before to secure your system by using physical access keys? What are the programs that are used to secure your system with external USB drives? Also, if you know of the best programs (one more secure, that is), do not let us know about it in the comments section below.

How to Lock/Unlock Mac or PC with USB

Create Folder lock without Any Software

Very often we face the problem to protect any type of data on the PC or any office where friends and colleagues are also using this device. But the biggest problem we face is how to protect your data in a common device. If you are thinking of buying any software to protect your data, such as a folder or disk lock closet. Then I suggest you do not buy any of these things.
After using this free trick lock folder. I'm sure you do not think about wasting precious money to buy any kind of distinct products for data protection. This can be open easily but for data protection for those who do not have technical knowledge about computer then this method works like a charm.

Steps To Create Folder Lock


#1: First of all open Notepad on your PC and paste the following in it.

@ECHO OFF
title Folder Locker
if EXIST "Control Panel.{21EC2020-3AEA-1069-A2DD-08002B30309D}" goto UNLOCK
if NOT EXIST Locker goto MDLOCKER
:CONFIRM
echo Are you sure u want to Lock the folder(Y/N)
set/p "cho=>"
if %cho%==Y goto LOCK
if %cho%==y goto LOCK
if %cho%==n goto END
if %cho%==N goto END
echo Invalid choice.
goto CONFIRM
:LOCK
ren Locker "Control Panel.{21EC2020-3AEA-1069-A2DD-08002B30309D}"
attrib +h +s "Control Panel.{21EC2020-3AEA-1069-A2DD-08002B30309D}"
echo Folder locked
goto End
:UNLOCK
echo Enter password to Unlock folder
set/p "pass=>"
if NOT %pass%==VivaTricks goto FAIL
attrib -h -s "Control Panel.{21EC2020-3AEA-1069-A2DD-08002B30309D}"
ren "Control Panel.{21EC2020-3AEA-1069-A2DD-08002B30309D}" Locker
echo Folder Unlocked successfully
goto End
:FAIL
echo Invalid password
goto end
:MDLOCKER
md Locker
echo Locker created successfully
goto End
:End

#2: Now Save this as locker.bat  and  then double click on locker.bat

#3: Your Folder Lock Password is VivaTricks

#4: If you want to change password then replace SafeTricks from above codes with your our Password.

Important Tips:


  • The first time, When you click on the file it will automatically create folder for you.
  • Then Paste your content into the Folder Created by the file.
  • Then Click again on the file to lock your Folder and Press Y to Lock your folder.
  • Now To open your locked folder, click every time on the file and enter your password.

Create Folder lock without Any Software

How to Increase Internet Speed ​​in Windows 10

You have a slow connection means wait a long time to load Web pages or files low. When it comes to downloading, it's even worse, because the wait lasts for hours or days. However, sometimes the problem is to contact. For example, if you are using Windows 10, part of the slowdown could be a system error. Fortunately, we can move on to the system settings and increase the speed of the Internet, and get at least a 20% increase.

Enable and configure bandwidth limit


Windows 10 does not provide 100% of the speed of your connection, because 20% is reserved for the use of the system. This means that you only have the remaining 80%. Therefore, to achieve a maximum speed of 100% need to activate and adjust the setup threshold "bandwidth reserves" limit.

Step 1: Press the "  Windows + R " keys. Within the "Run" box, type "gpedit.msc" in the "Open" field, and then click the "OK" button;


Step 2: In the "Local Group Policy Editor", click "Computer Configuration". Just double-click on "Administrative Templates", then "Network".

When entering this folder, click "QoS Packet Scheduler". Finally, double click on the option "Limit reserveable bandwidth";


Step 3: Now, check the "Enabled" option, adjust the bandwidth limit (to 100 or according to your need) and click the "OK" button.


Disable the Updates option for more than one location

In Windows 10, the Microsoft added the "more than one location updates" option. The feature provides updates parts for the computers on your local network or internet from your system. But this affects the speed of the internet and is not always necessary. Fortunately, you can disable this option to get the maximum speed.

Step 1: Click the " Start" button and when the menu appears, touch the gear icon ("Settings");


Step 2: Under "Settings", go down the screen and click on the item "Updates and security";


Step 3: Then tap "Advanced Options";


Step 4: Under "Advanced Options", go to "Choose how updates are delivered";


Step 5. Finally, move the slider to disable the "Updates from more than one location" option.


Clear your cache and cookies

Sometimes having cookies and caching can affect the speed of your internet. In this situation the best thing to do is to clean up all that dirt. There are two ways to do this: clean it manually in the browser or use a third party application such as CCleaner to clean them on every browser on your computer.

How to Increase Internet Speed ​​in Windows 10


Windows 10 has a mode "slide off" hidden to turn off the computer. Imported from Windows Phone, the function makes the image appear at the top of the screen for the user to pull up the bottom, and turn off the computer. The resort is also a good solution for those who have problems with accidental closure on the computer. Check out this tutorial how to turn the trick in the latest operating system from Microsoft.
Step 1: On your desktop, then right-click any empty space and click "New> Shortcut."


Step 2: In the window that appears, type the address "%windir%\System32\SlideToShutDown.exe"  and click "Next";
%windir%\System32\SlideToShutDown.exe

Step 3: On the next screen, type the name for the shortcut. Try to be descriptive for easy identification. Tap "Finish";


Step 4: Right-click on the new created icon and then on "Properties";


Step 5: On the shortcut tab, click "Change Icon." If a warning appears, just confirm;


Step 6: A list of icons will appear. Select a disconnect button or other icon of your choice and click "OK";


Step 7: Click "Apply" and then "OK";


Step 8: With the icon created, just click it when you want to shut down your PC. A tab will appear at the top of the screen and the user can drag with the mouse or press "Enter" on the keyboard;


Done! Now you know how to use the "Slide to shut down" in Windows 10 of your PC.

Slide Down to Shutdown PC in Windows 10

Three ways to see PC specifications in Windows 10

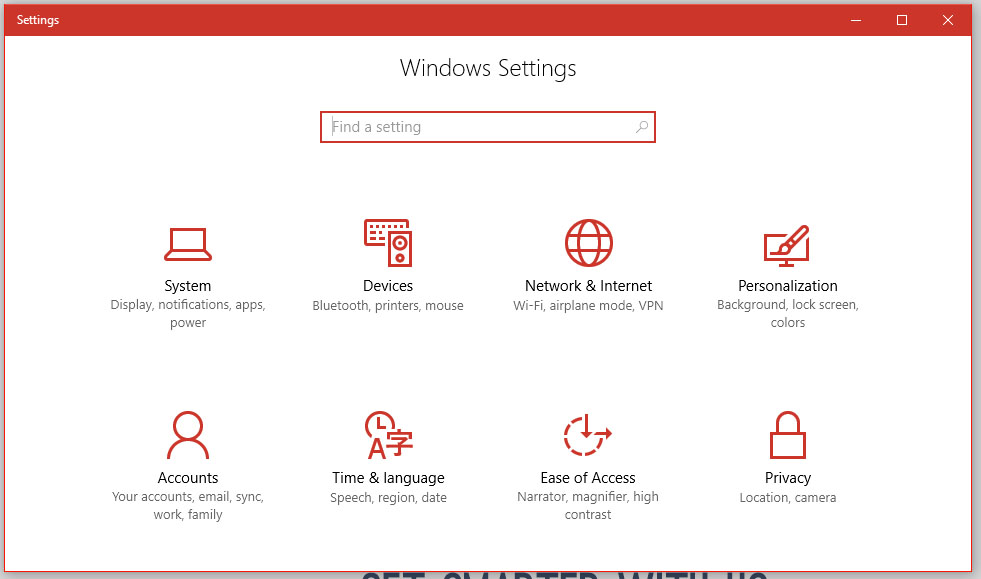
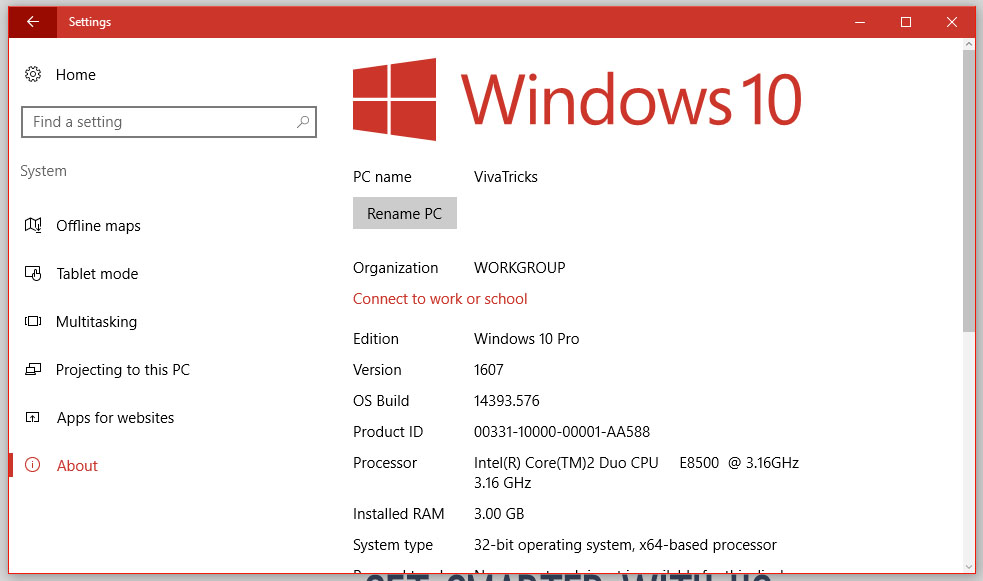
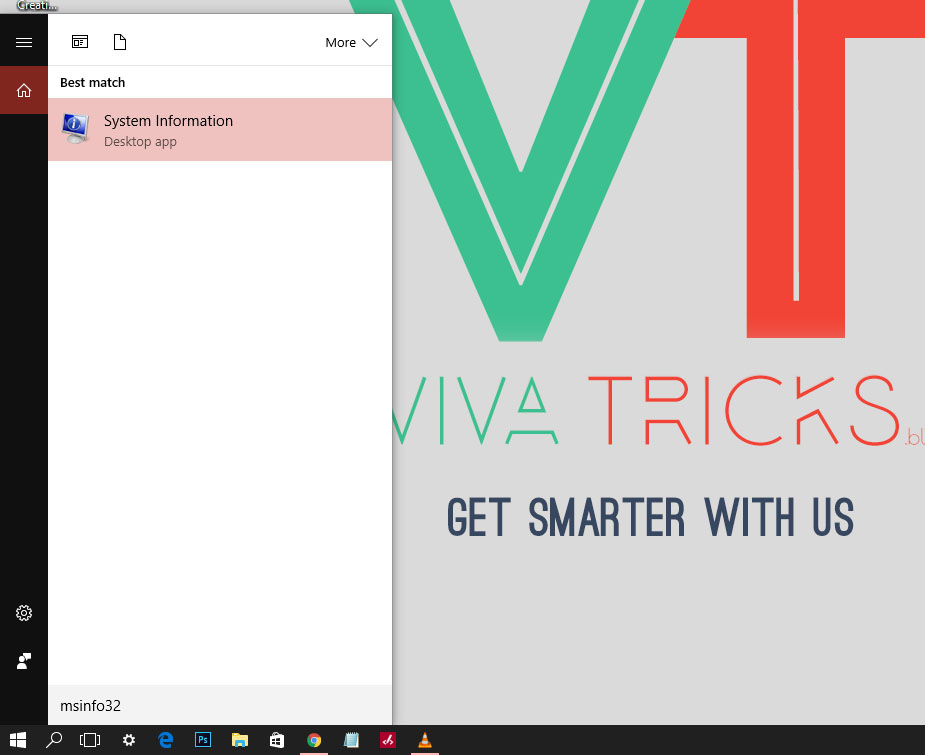
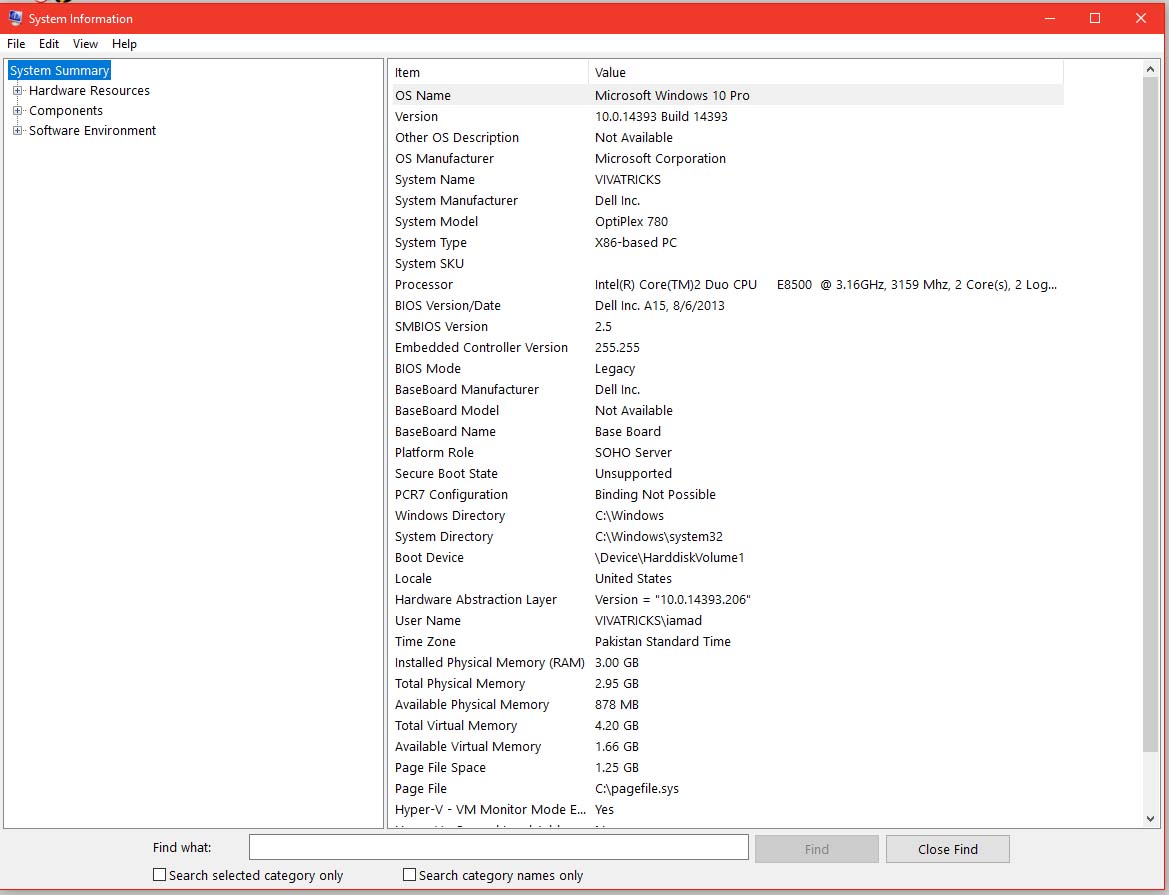
You can see all the specifications of a personal computer, where the hard drive capacity, RAM and other information from the three different ways in your system's memory. You can use the command prompt or system resources. For the implementation of this query is not necessary to install any program is very simple and implementation. Check the tutorial three ways to see the computer in Windows 10 specifications.

Method 1


Step 1: Open the "Settings Panel" and click "System";

Three ways to see PC specifications in Windows 10

Step 2: In the left column click the "About" option and check the specification of your computer.

Three ways to see PC specifications in Windows 10

Method 2

Step 1: Search for "msinfo32" and click on "System Information";

Three ways to see PC specifications in Windows 10

Step 2: You will see all the information about your PC.

Three ways to see PC specifications in Windows 10

Method 3

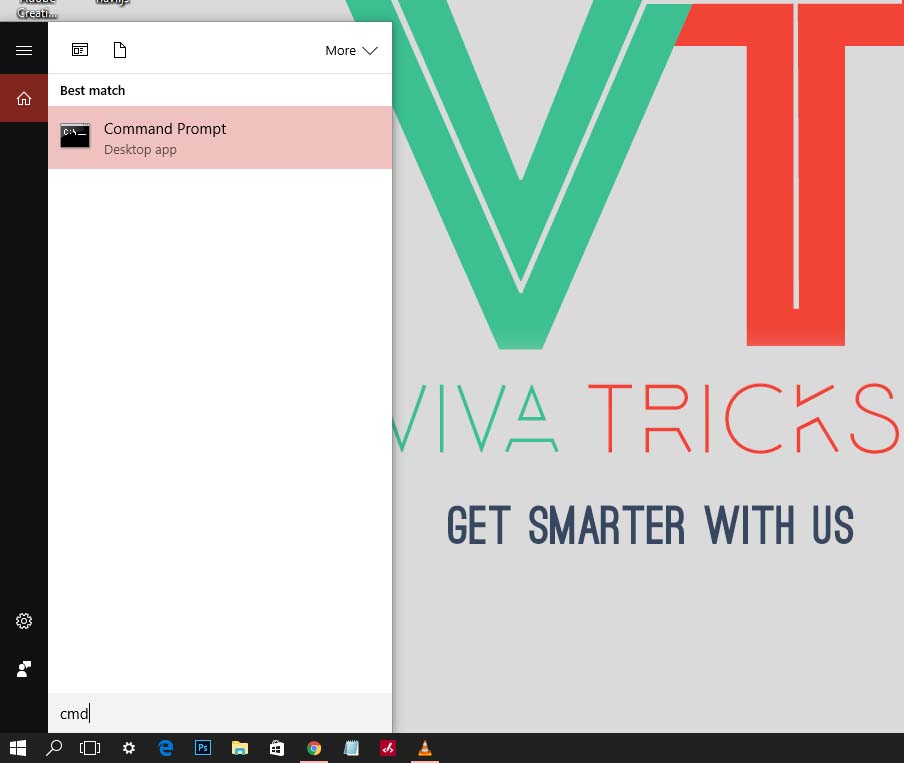
Step 1: Type "cmd" and open the "Command Prompt";

Three ways to see PC specifications in Windows 10

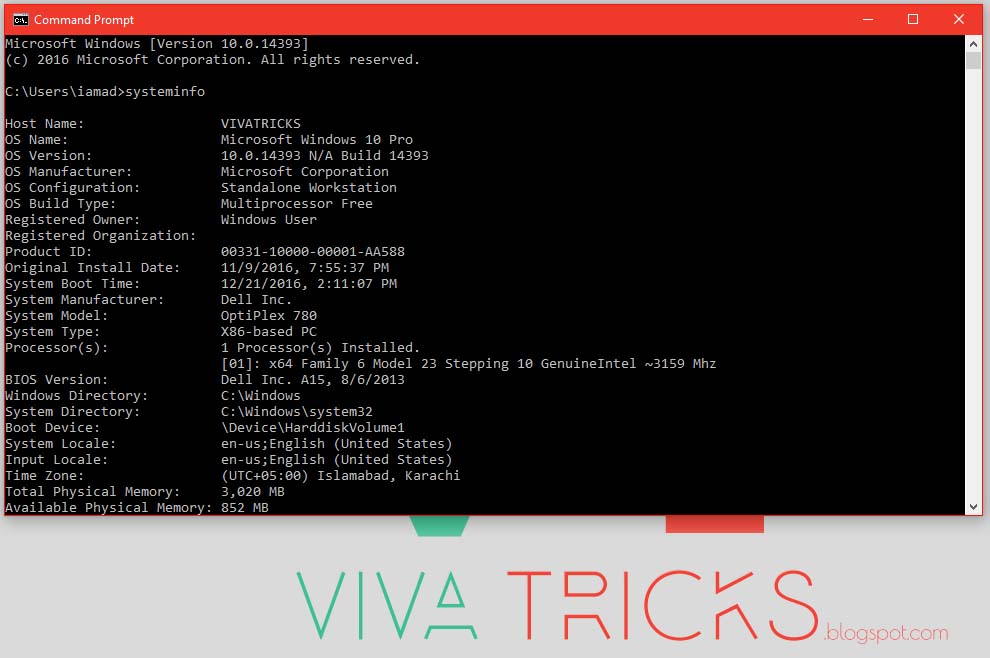
Step 2: Type "systeminfo" and press Enter to check the specifications of your computer.

Three ways to see PC specifications in Windows 10

Three ways to see PC specifications in Windows 10

How to Remotely Access Android From PC

TeamViewer software is a proprietary computer software for remote control, desktop sharing and online meetings package, web conferencing and file transfer between computers. Versions are available for Microsoft Windows, Mac OS X, Linux, iOS, Android, Windows RT, Windows Phone 8 and BlackBerry operating systems. It is also possible to access the device works TeamViewer software with a web browser. While the main focus of the application for remote control of computers, listed cooperation and provide features. TeamViewer software can be used without charge by non-commercial users, and Business, Premium and corporate versions are available. TeamViewer limited program was established in 2005 in Uhingen, Germany. Private equity firm based in the UK-based Permira got TeamViewer GmbH program more Durham, North Carolina-based developer GFI software programs in 2014. The company is also hosting a cloud called Airbackup online backup service.

How to Remotely Access Android From PC?


#1: Download and Install TeamViewer for Windows, Mac or Linux

#2: Install TeamViewer Quick Support App in your Android Phone.


#3: Install Quick Support Add-On  App depends on your Phone Company. It will also ask you automatically if you once open the Quick Support App.

How to Remotely Access Android From PC?

#4: Now Open the TeamViewer in PC and Phone.

#5: Copy ID from Phone.

How to Remotely Access Android From PC?

#6: Type in PC as Partner ID then Click on Connect to Partner Button.

How to Remotely Access Android From PC?

#9: Again Allow it from your Phone.

How to Remotely Access Android From PC?

#10: Phone Screen will be Appear on PC Screen. Use Phone Directly from PC

How to Remotely Access Android From PC?

#11: Done.

How to Remotely Access Android From PC?