Halaman

    Social Items

Visit Namina Blog
Showing posts with label Windows 10. Show all posts


Along with the Windows 10 anniversary update that was released last year, an unprecedented feature has been brought to Windows and this Bash on Ubuntu on Windows. Make no mistake, this shell bash on Windows is not a virtual machine nor a compiler, but rather a new Windows Linux subsystem. It was developed as a result of collaboration between Microsoft and Canonical, the parent company of Ubuntu Linux. If you are a developer who often turns between Linux and Windows, this feature will definitely be important to you. However, the Bash shell does not come installed by default and you will have to access the settings and tweak a little, before you can install it on your system. Now, do not start worrying, we will let you know exactly how you can Linux Bash Shell on Windows 10:

Setting Up Linux Bash Shell On Windows 10


Note
Linux Shell is the feature that was introduced in the Windows 10 anniversary update last year, so you need to be installed before proceeding with the whole process.

The process is not very complicated, but it will definitely take a few minutes of your time. Simply follow the steps correctly to avoid any confusion and get it installed on your system immediately:

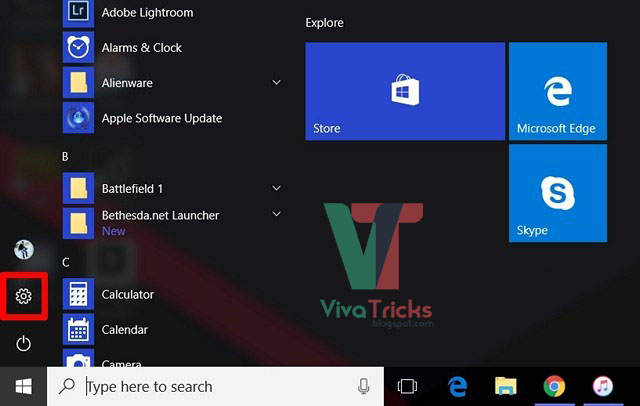
#1: Go to Start Menu and click on the gear icon in order to go to "Settings".


#2: Now, click on "Update & Security".


#3: Once done, go to the "For developers" section and click on "Developer Mode" to enable it.


#4: Now that you have enabled the developer mode successfully, you need to enable the Windows subsystem for Linux. To do this, first go to Control Panel and click "Programs."


#5: Now, click on "Turn Windows features on or off" in the Programs and Features section.


#6: Now, click on "Turn Windows features on or off" in the Programs and Features section.


#7: Now, a new window will appear on the screen. Here, scroll down and enable the Windows Subsystem for Linux (Beta). Once you are finished, click OK, wait until the process is complete, and then restart your computer.


#8: After restarting your PC, type "bash" in the Cortana search bar and hit Enter to run the command.


#9: Once bash opens up, type "y" to continue. Wait for a few minutes until Bash on Ubuntu on Windows is downloaded from the Windows Store and installed on the Windows subsystem.


#10: Once everything has been downloaded and installed, you will be asked to enter a new UNIX username and password. You will have to retype the password, and once the password is matching, installation will be successful.


Bash on Ubuntu on Windows: The Experience


Now that you've successfully got a bash on Ubuntu in Windows 10 to work on your computer, you can start using Linux-compatible file systems and various commands, similar to what you would do on a Linux computer. However, keep in mind that you have not installed Ubuntu on your computer. This is basically a software that can be used to try out standard Linux commands right inside Windows. If you're new to the Linux environment, you can try the following commands that you personally tried:

grep - searches for named input files for fonts that match the given pattern.
sed - A stream editor that is used to make basic text transitions on input stream
awk - Process and analysis of text files.
rmdir - Remove directory.
man - View the directory of the specified command that was entered. For example, you can write "man rmdir" for relevant information on the Ramirer.
It is not only the use of commands that must be excited, because users will be able to implement Windows, as well as Linux applications right from the Bash shell. In addition, you will also be able to run Bash Shell scripts and Linux command line applications.

Ready to Use Bash Shell in Windows 10?


Developers can take full advantage of the Bash shell if they normally work on both Linux and Windows. Thanks to Microsoft, this is finally possible. However, the Bash shell will either be an advantage that you are going to use widely or not at all. Most users do not really care about this feature, but if you really want to experience and experience the Linux environment, you can do it instantly with ease. I do not think you're installing Linux directly on your computer, because "Bash on Ubuntu on Windows" is just a tool to run Linux commands directly from Windows. So, are you excited to try out shell bash linux on windows 10? Let us know, by shooting your opinions in the comments section below below.

How to Setup Linux Bash Shell on Windows 10


If you are used to doing some late night work for long hours in front of your computer, you may have realized that the pressure on your eyes is real. In order to counter this, you probably have used f.lux on Windows, and if you are a users of YOS or Mac, you probably used the night shift. With the release of Windows 10 Creators Optite again in April, Microsoft has made it much easier by pushing out a neat new feature called Night Light, which aims to reduce the eye strain used by filtering the blue light emitted from the screen. The right feature was built in Windows 10 and works better than f.lux. So, without further ado, let's take a look at how to set up and use Night light in Windows 10:

Enable Night Light in Windows 10


Note
Night Light is a feature that was introduced into Windows Update 10 creators last year, so you need to have it installed before proceeding with the whole process. I have tested this feature on my laptop running Windows 10 Build 1703 Preview Inside.

Night light can be easily enabled in Windows 10 settings. Just follow these steps to turn it on:

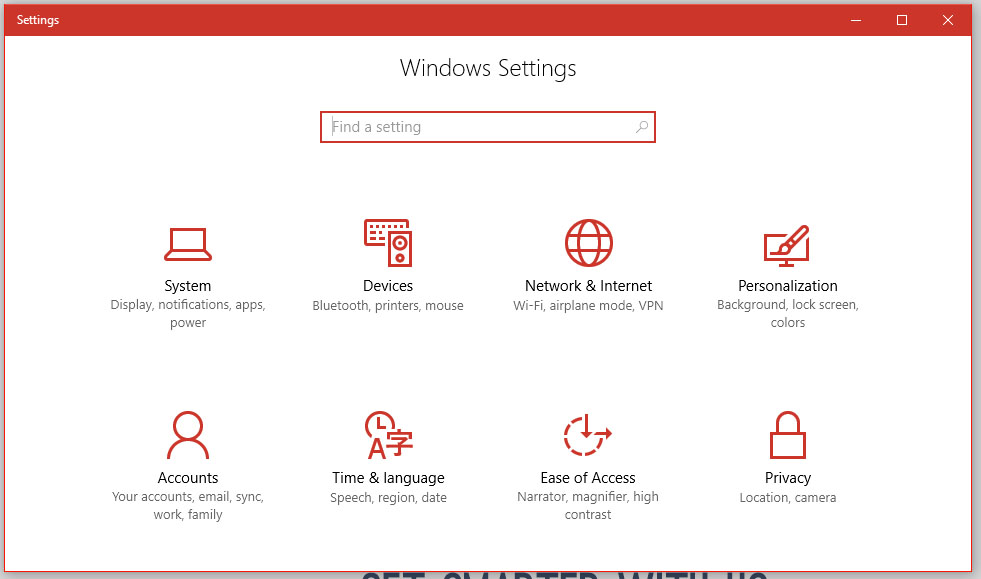
#1: Go to Start Menu and click on the gear icon, so that you can go to "Settings".


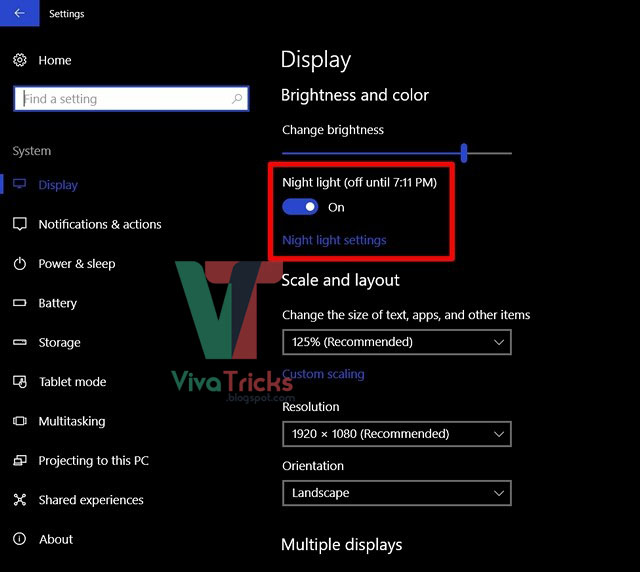
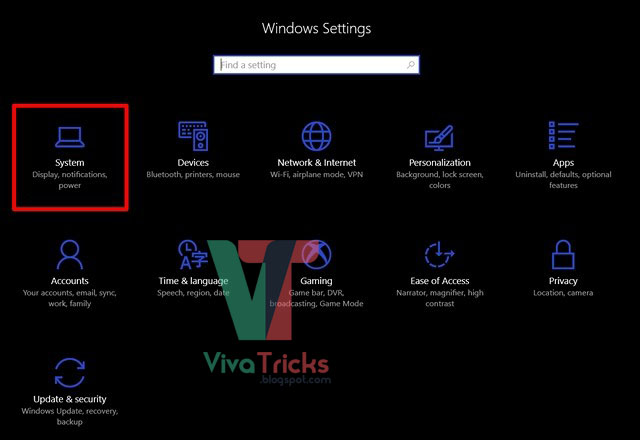
#2: Now, click on the "System" section to go to System settings.


#3: Once you’ve entered System settings, you’ll be able to turn ON Night light in the "Display" section.


Customize and Schedule Night Light

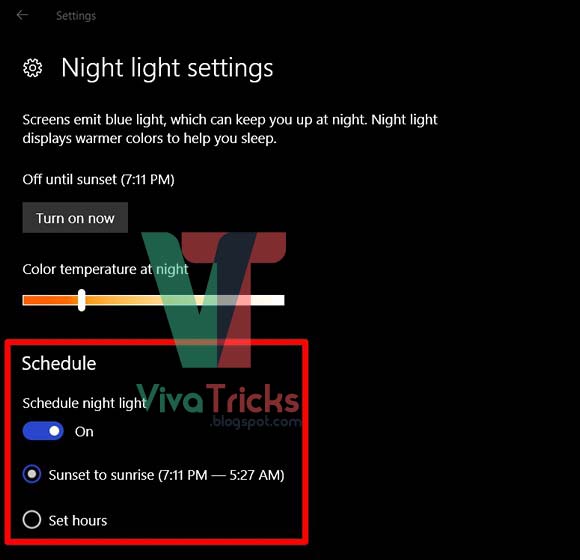
The night light, by default, is set to turn automatically by sunset and turn off before sunrise depending on your area. Also, there is preset color temperature for night light. However, you can easily change these settings according to your preferences simply by following these steps:

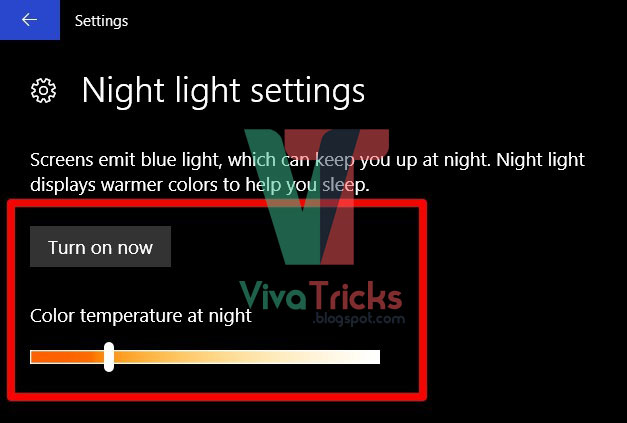
Go to the "Night Light Settings" right below to customize it according to your preferences. You will notice the slider to adjust the night color temperature completely according to your preferences, so this will be the color temperature that will be used, next time when the night light is turned on. You can also turn on the night light immediately, without waiting for the preset time by clicking "Turn on  Now".


There is a light night schedule option as well. If you want to disable scheduling completely, you can turn it off by moving the slider. If you want to customize the schedule according to your needs, click on "Set Hours" and simply choose your pet turn and turn off time.


Well, that's pretty much it, as now the night light will automatically turn off as per your preset interval. When the night light is turned on, you will see a warmer warmer color attaching, which emits a blue light from the screen and is much easier on the eyes.

Avoid Eye Strain With Night Light on Windows 10


Night light is Microsoft's attempt to help people come out, to reduce the pressure on their eyes because of long hours of use in front of their computers especially during late at night. It works like a charm, as you expect and it is now up to you to take full advantage of what Microsoft has to offer. We strongly recommend you to keep this feature enabled on your system. So, have you ever used the night light feature on your Windows 10 machine? Let us know what you think about this neat feature simply by dropping a few words in the comments section below below.
How to Enable Night Light in Windows 10

How to Increase Internet Speed ​​in Windows 10

You have a slow connection means wait a long time to load Web pages or files low. When it comes to downloading, it's even worse, because the wait lasts for hours or days. However, sometimes the problem is to contact. For example, if you are using Windows 10, part of the slowdown could be a system error. Fortunately, we can move on to the system settings and increase the speed of the Internet, and get at least a 20% increase.

Enable and configure bandwidth limit


Windows 10 does not provide 100% of the speed of your connection, because 20% is reserved for the use of the system. This means that you only have the remaining 80%. Therefore, to achieve a maximum speed of 100% need to activate and adjust the setup threshold "bandwidth reserves" limit.

Step 1: Press the "  Windows + R " keys. Within the "Run" box, type "gpedit.msc" in the "Open" field, and then click the "OK" button;


Step 2: In the "Local Group Policy Editor", click "Computer Configuration". Just double-click on "Administrative Templates", then "Network".

When entering this folder, click "QoS Packet Scheduler". Finally, double click on the option "Limit reserveable bandwidth";


Step 3: Now, check the "Enabled" option, adjust the bandwidth limit (to 100 or according to your need) and click the "OK" button.


Disable the Updates option for more than one location

In Windows 10, the Microsoft added the "more than one location updates" option. The feature provides updates parts for the computers on your local network or internet from your system. But this affects the speed of the internet and is not always necessary. Fortunately, you can disable this option to get the maximum speed.

Step 1: Click the " Start" button and when the menu appears, touch the gear icon ("Settings");


Step 2: Under "Settings", go down the screen and click on the item "Updates and security";


Step 3: Then tap "Advanced Options";


Step 4: Under "Advanced Options", go to "Choose how updates are delivered";


Step 5. Finally, move the slider to disable the "Updates from more than one location" option.


Clear your cache and cookies

Sometimes having cookies and caching can affect the speed of your internet. In this situation the best thing to do is to clean up all that dirt. There are two ways to do this: clean it manually in the browser or use a third party application such as CCleaner to clean them on every browser on your computer.

How to Increase Internet Speed ​​in Windows 10


Windows 10 has a mode "slide off" hidden to turn off the computer. Imported from Windows Phone, the function makes the image appear at the top of the screen for the user to pull up the bottom, and turn off the computer. The resort is also a good solution for those who have problems with accidental closure on the computer. Check out this tutorial how to turn the trick in the latest operating system from Microsoft.
Step 1: On your desktop, then right-click any empty space and click "New> Shortcut."


Step 2: In the window that appears, type the address "%windir%\System32\SlideToShutDown.exe"  and click "Next";
%windir%\System32\SlideToShutDown.exe

Step 3: On the next screen, type the name for the shortcut. Try to be descriptive for easy identification. Tap "Finish";


Step 4: Right-click on the new created icon and then on "Properties";


Step 5: On the shortcut tab, click "Change Icon." If a warning appears, just confirm;


Step 6: A list of icons will appear. Select a disconnect button or other icon of your choice and click "OK";


Step 7: Click "Apply" and then "OK";


Step 8: With the icon created, just click it when you want to shut down your PC. A tab will appear at the top of the screen and the user can drag with the mouse or press "Enter" on the keyboard;


Done! Now you know how to use the "Slide to shut down" in Windows 10 of your PC.

Slide Down to Shutdown PC in Windows 10

Three ways to see PC specifications in Windows 10

You can see all the specifications of a personal computer, where the hard drive capacity, RAM and other information from the three different ways in your system's memory. You can use the command prompt or system resources. For the implementation of this query is not necessary to install any program is very simple and implementation. Check the tutorial three ways to see the computer in Windows 10 specifications.

Method 1


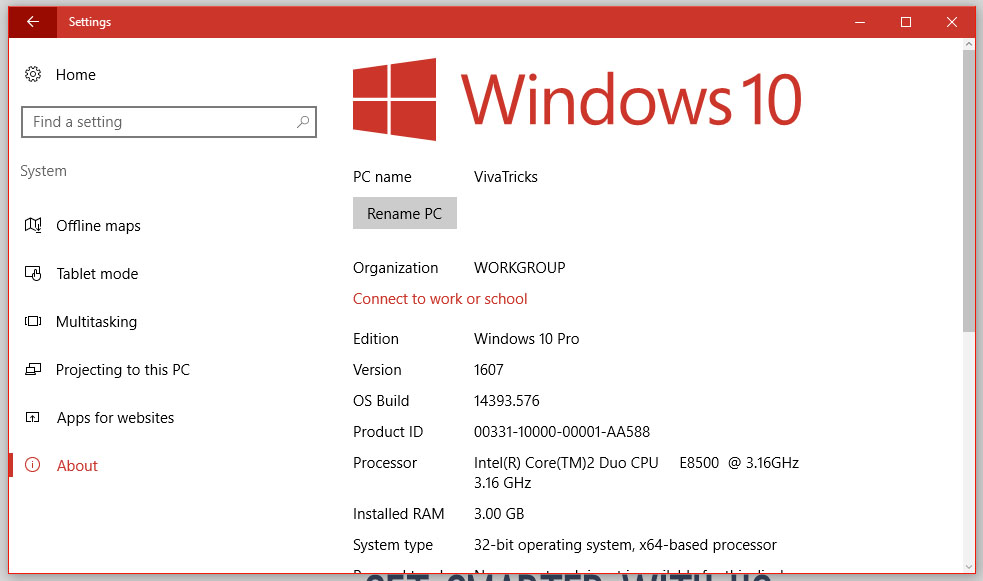
Step 1: Open the "Settings Panel" and click "System";

Three ways to see PC specifications in Windows 10

Step 2: In the left column click the "About" option and check the specification of your computer.

Three ways to see PC specifications in Windows 10

Method 2

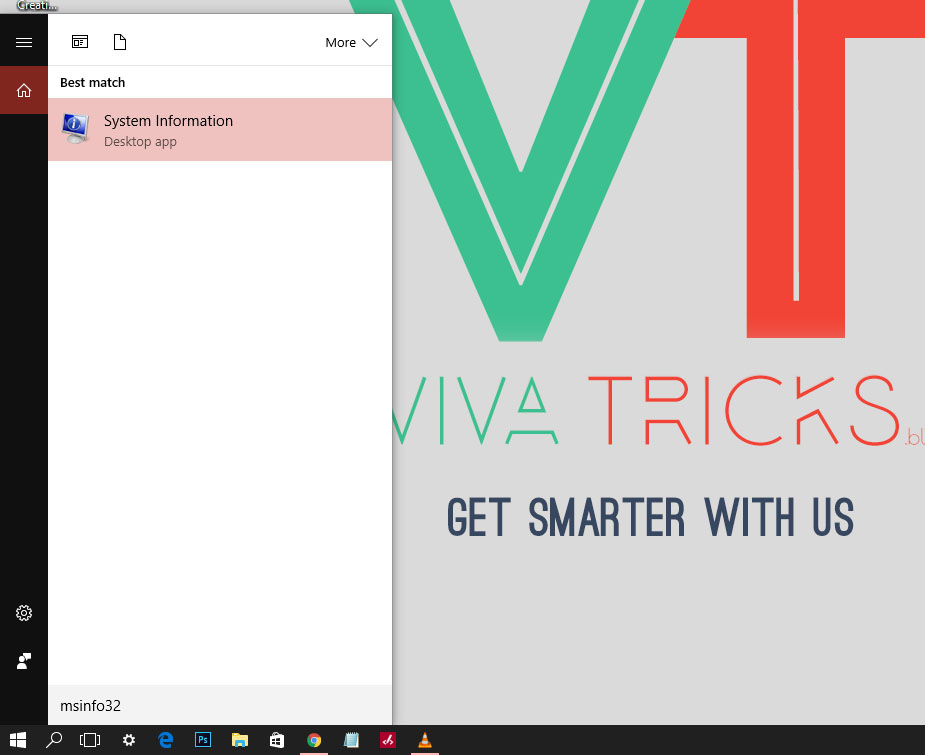
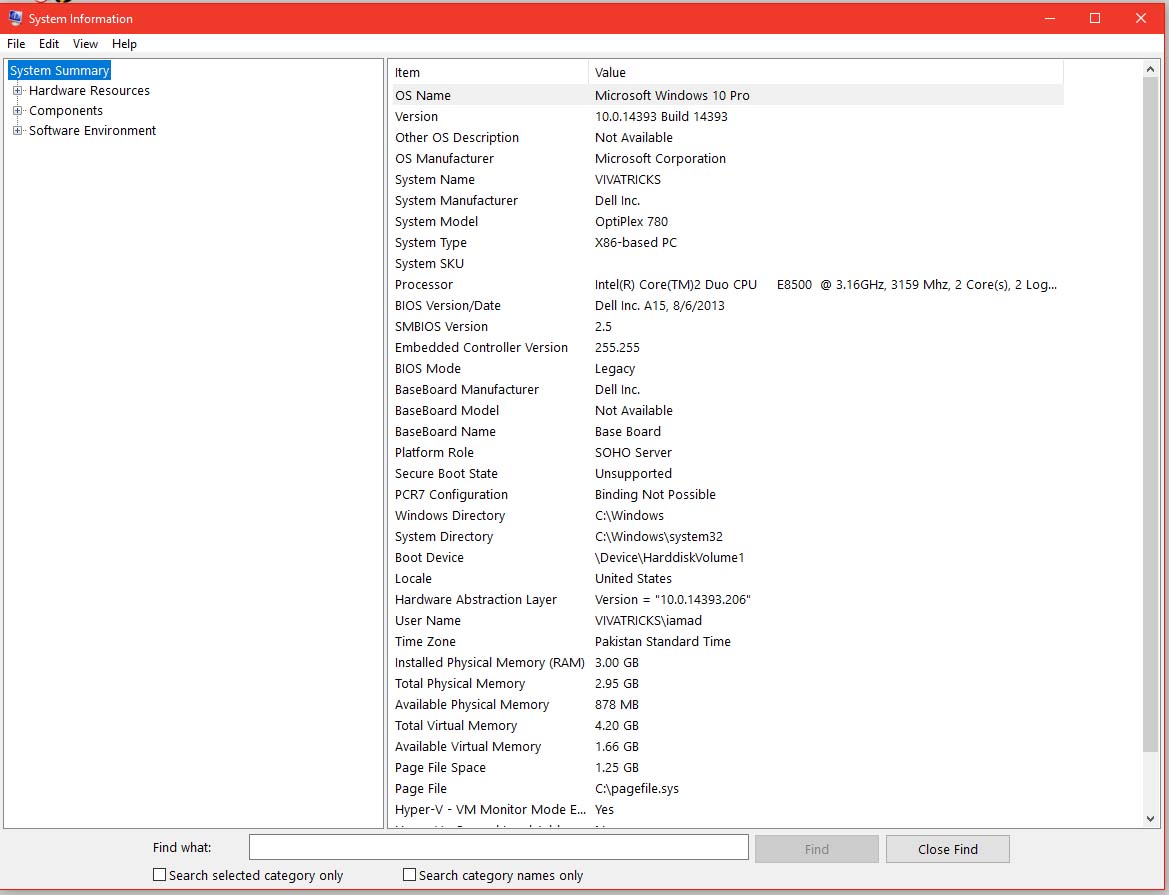
Step 1: Search for "msinfo32" and click on "System Information";

Three ways to see PC specifications in Windows 10

Step 2: You will see all the information about your PC.

Three ways to see PC specifications in Windows 10

Method 3

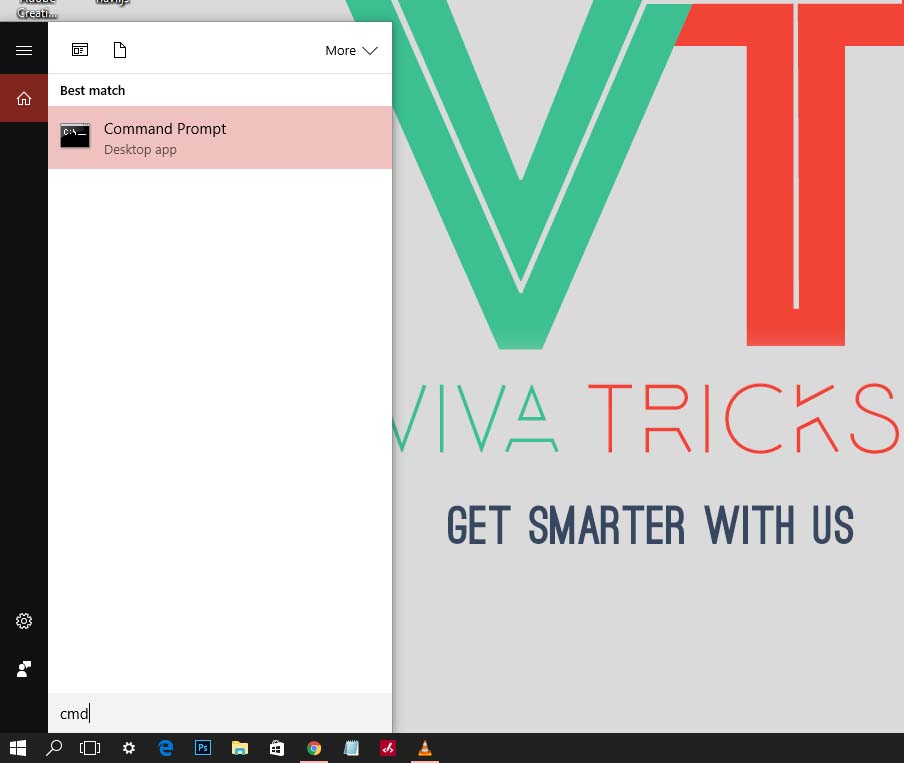
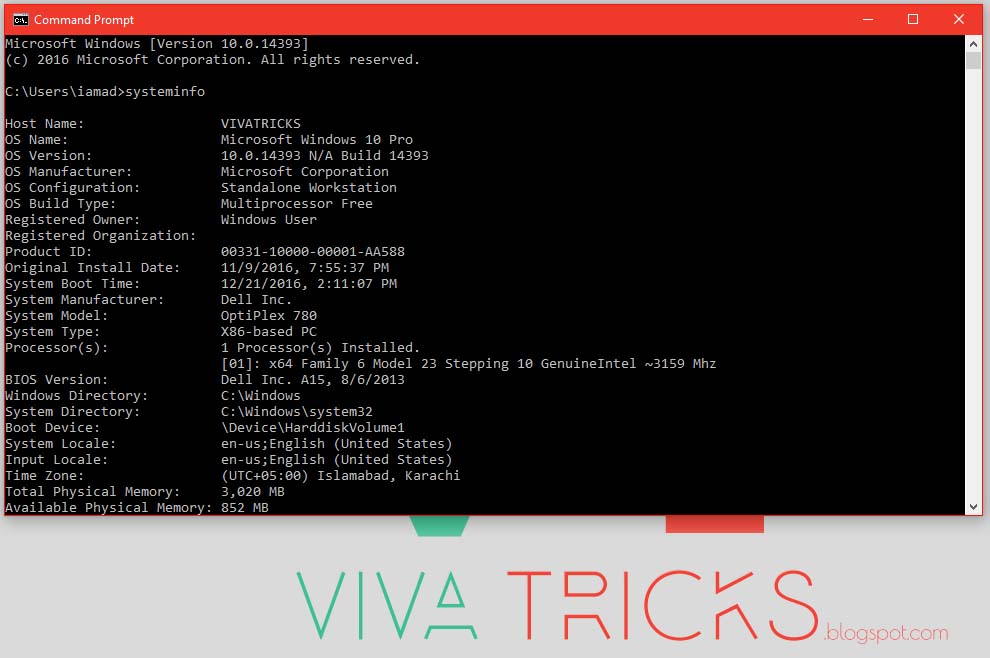
Step 1: Type "cmd" and open the "Command Prompt";

Three ways to see PC specifications in Windows 10

Step 2: Type "systeminfo" and press Enter to check the specifications of your computer.

Three ways to see PC specifications in Windows 10

Three ways to see PC specifications in Windows 10